Translate

Wednesday 5 December 2018

Poinsettia Bouquet Girl Card "Dt The Crafty Addicts Challenge"

Hey Everyone! 
I'm here to share with you another little bit of inspiration, we have a new challenge that has just 

gone live today over at the crafty addicts challenge blog.

Our theme this month is Theme anything goes/ optional theme It’s Christmas time ^_^

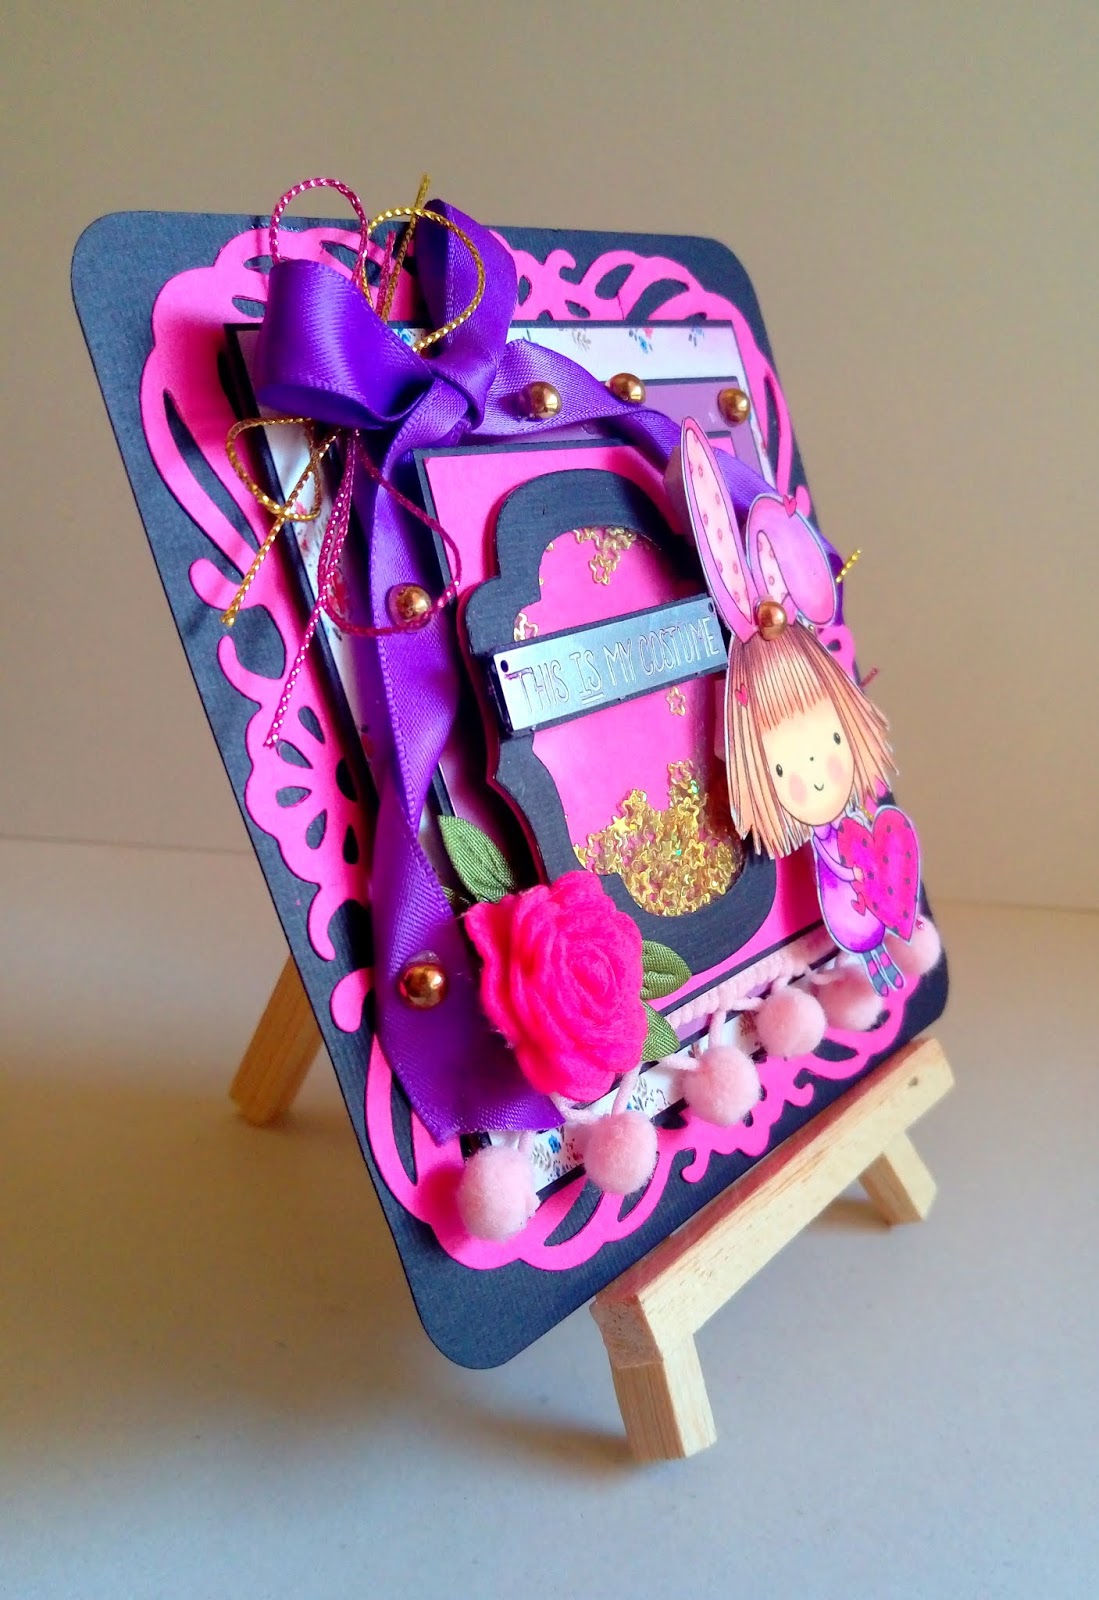
here is what I created, hope you like it?!


RORY'S CHRISTMAS POISETTIAS


SUPPLIES LIST:
STAMPS:
DIES

CottageCutz Christmas Greetings Die


PAPER/CARD
Heavy weight papers (local store)200GSM
Golden mirror cardstock from my stash


ACCESSORIES & TOOLS
Spectrum Noir Markers
Prima marketing 3D clear gloss gel mixed with white glitter flakes
Nuvo Crystal Drops Collection - Metallic Bright Gold
Nuvo - Crystal Drops - Gloss Simply White


Thanks so much for stopping by and hope that I have inspired you to come on over and join us for this month's challenge.


Crafty Hugs
Zahraa (DT)

xxx

I will be entering this piece into the following challenges:-

Sunday 2 December 2018

MR & MRS SNOW COUPLE CARD

HI dear crafters, I have a cute project for this month's Pile 


I have created step card & i used craftysentimentsdesigns image.Mr & Mrs snow man after coloring it with Spectrum Noir markers & highlighted it
using Nuvo drops ti mimic the snowy ground, & 3D clear gloss gel mixed with white glitter flakes to add cool 3D touches to the snow couple.
finished it off with ribbon & words sticker. the background created using embossed card stock with lovely snowflakes pattern.

SUPPLIES LIST:
STAMPS:
EMBOSSING FOLDER:

Cuttlebug A2 Embossing Folder, Snowflakes


PAPER/CARD
Heavy weight paper (local store)250GSM RED& WHITE


ACCESSORIES & TOOLS
paper stickers
Tacky Glue
Spectrum Noir Markers
Ribbon
Nuvo glitter drops - Silver moondust
Prima Marketing 962982 3D Gloss Gel - Transparent
White glitter flakes
BLING  from my stash

Thanks so much for stopping by and hope that I have inspired you to come on over and join us for this month's challenge.

Crafty Hugs
Zahraa (DT)

I'm playing along in a few challenges  too :-


Wednesday 21 November 2018

DT CARD FOR PILE IT ON BLOG CHALLENGE:Your Favourite Way to Colour an Image

HI drear crafters, I have another project for this month's Pile 

It On! Challenge, where the themes are:


'Your Favourite Way to Colour an Image')

Red & Green, such a yummy color combination for this time of year! What do you think? ^_^


I used Mo Manning's "Soon" digi image! I can just imagine what this little guy is feeling, waiting for enough snow to (try it out ) ^_^

My favourite way to colour an image (as you'll probably know if you're a regular visitor 
to my blog) is with Specturm Noir markers.

then i created simple background with red pattern paper then layered another green pattern paper
with a window cut with nestabilities dies showing the colored image behind, i covered the image with acetate & decorated the card with golden glitter glue. finishing it off with dimensional stickers & golden twine/


Hope you enjoyed this card as i do!
thanks for stopping by
Hugs, DT  Zahraa 
PILE IT ON DESIGN TEAM MEMBER

I'm playing along in a few challenges  too :-

My Time to Craft - Let it Snow

SSS - All That Glitters Is Gold

Sweet Stampers - Christmas

Craftyhazelnut's Patterned Paper Challenge-November Anything Goes with Patterned Paper


Challenge 154 # ANG


Wednesday 7 November 2018

Girly Card (Design Team Project For The Crafty Addicts Challenge Blog

Hi there, I'm here to share with you another little bit of inspiration, we have a new challenge that 

has just gone live today  at the craftyaddicts challenge blog.

Our theme this month is make it girly  ^_^

here is what I have created, hope you like it?


taking 13*13 cm card & i have created layered background using layers & mats of pattern paper & card stock, flowers, burlap trim , bling, word die cut.& FINISHING OFF WITH hand colored digi from  

    SheepSkiDesigns

as a focal point after coloring it with Spectum Noir markers .


SUPPLIES LIST:
STAMPS:
DIES

Merry Christmas Dienamic die


PAPER/CARD
Heavy weight paper (local store)200GSM
Pattern paper from my stash


ACCESSORIES & TOOLS
paper stickers
Tacky Glue

Egyptian Gold Twinkling H2O

Spectrum Noir Markers
Ribbon
burlap trim
BLING  from my stash


Thanks so much for stopping by and hope that I have inspired you to come on over and join us for this month's challenge.


Crafty Hugs
Zahraa (DT)

xxx

I will be entering this piece into the following challenges:-


Classic Design Team Open Challenge November # 11


Tuesday 6 November 2018

Mr Rabbit birthday card (DT CARD FOR PILE IT ON BLOG)

Our Pile It On challenge is up and running!  Our great sponsor this month is Dr. Digi

The theme for this month is Pets/Animals.  Always a fun one!

I USED THIS DIGI  White Rabbit & COLORED IT
USING SPECTRUM NOIR MARKERS


 I USED (Docrafts Xcut A6 Tri-Boss Embossing Folder - Chronology - Clocks )
TO CREATE THE BACKGROUND THEN I ADDED DIY CUTE CLOCK EMBELLISHMENT 
"I created my own mould with 2part moulding putty and a metal charm (rabbit clock) from my stash.  After the mould was cured, I removed the charm and then I used some clay to create more of the charms and coloured the one for this card using Mica spray and some gilding wax".                             
& decorrated the colored digi with  GLOSSY ACCENTS TOUCHES
FINISHED IT OFF WITH A SENTENCE STAMPED FROM Altenew BIRTHDAY BASH Clear Stamp Set .
....
I'D LIKE TO INTER THESE CHALLENGES:

Monday 22 October 2018

Fantasy purple card Pile It On DT card

HI DEAR CRAFTERS
Here is my card for our BONUS October challenge :

Pile It On! #147 - Black, Purple & Orange and/or Fantasy


This card uses Penny Black 30-063 Mimi & Miles .I colored the image using Sectrum Noir markers. the background was created using die cuts & layering & matting.I added a tiny cute shaker element too. I finished it off with etched metal cute sentence ^_^

 I am entering these challenges:

As You Like It Challenge: Clean & Simple OR Fussy & Fancy
A Gem of a Challenge #228: Anything Goes
Crafty Sentiments challenge: Halloween


Monday 15 October 2018

CRAFTS DREAMY OCTOBER DT CARD: VINTAGE CARD.

Here is my October DT project for Crafts Dreamy. There is a monthly challenge at their blog 

http://craftsdreamy.blogspot.com.eg/ where you will find all the details & a new mood board 


each month for inspiration.


The theme is anything goes; you can make a card, tag, ATC, scrapbook layout, pocket letter 
mixed  media, collage piece etc the possibilities are endless! 
This Month's Mood Board features this BEAUTIFUL Autumn colors.


Today i'll  share with you a tutorial on how to make this vintage card. 
Fabric designs and colors have been a huge inspiration to me lately. For this card I wanted to mimic a piece of embossed vintage velvet fabric that I had seen. How fun to translate designs into 
something real for me as a paper crafter. 

Step one:

Paint a piece of recycled card stock with a thin layer of Gesso and talc powder. Try and paint in two directions to create texture.

Step two:


Use three colours of distress oxide and black acrylic paint and paint over the 'gessoed' piece. Notice how the gesso texture really comes alive when you add colour to it. I started with touches of black paint first, then added distress oxides in selected areas.


Step three:

Leave the ink to dry and then emboss a pattern onto the card stock piece using an embossing folder and your machine. The pattern doesn't look like much until the next step. 

Step four:

Use your black ink pad and lightly swipe the ink pad across the embossed area. The ink highlights the embossed area beautifully. While the ink is still wet, apply clear embossing powder and heat set the powder. The heat embossing leaves the embossed paper
 with a gorgeous shine. 

Step five:


Use metallic pigment ink and apply with a jumbo dauber to add some more interest and character to it. The ink sticks to some areas where the embossing didn't take and adds a beautiful shimmer on top of the heat embossing. 

Step six:

Finally, trim the panel and create a beautiful card that looks rich and luxurious just like a piece of fabric. Combining your products together leaves room for creating magic in layers.


Hope you enjoyed this tutorial!
thanks for stopping by
Hugs, Zahraa 


I'm playing along in a few challenges  too :-


Starry Night