Translate

Friday, 6 April 2018

Happy Birthday mixed media card

Hey everyone!!!I hope all is well J
I have mixed media card to show you all today......CHECK IT OUT!!!


I made this mixed media piece for Simon says stamps Wednesday challenge, Birthday themed card .

I have created the background with acrylic painting & DIY heavy gesso, Then added layers of corrugated paper & burlap to add texture & interest to my grungy card 


Then I used DIY tinted heavy gesso to add a lovely rusty texture to the card

(You can find the recipe below if you fancy making some 

yourself)

Finished off with stamped steam punk girl colored with watercolors & some paper flowers & bling to add depth & interest


HOMEMADE HEAVY GESSO PASTE 1 tablespoon of plaster of paris
1/2 table spoon of white gesso 1/2 tablespoon White All-purpose School Glue 1 tablespoon (colored) acrylic Paint Instructions: Combine plaster powder, glue, gesso,and acrylic paint using a disposable wooden stick or plastic spoon on a glass slab,mix until you get it to the consistency you are looking for. Mix well to eliminate any lumps. Cover & use as needed.


Supplies list :

-
Stampers Anonymous-Brett Weldele Cling Rubber Stamp Set. 
INKS- StazOn jet black PAPER/CARD- Heavy weight paper (local store)
Corrugated paper DIES Spellbinders S5-152 Shapeabilities Expandable Patterns Fancy Lattice Die 

ACCESSORIES & TOOLS- Prima Marketing watercolors tropical set Tacky Glue, Brown ,Green acrylic paint
TH Distress Paint- Barn door DIY heavy gesso paste
Paper flowers
Burlap
Stickles (Lime Green)
Golden glitter glue
Bling from my stash


I hope you found some inspiration today. Thanks for stopping by. 

I'm playing along in a few challenges too :-


Monday, 2 April 2018

Tri-flower inspiration

Happy long Weekend All!
Today I have a pretty card to share with you all
I made this card  for Simon Says Stamps Monday challenge
idea inspired by using three flowers.
It is perfect for the all sorts new beginnings challenge ^_^
I went with Layers ... Elements of Springtime ... Three flowers ... Diecut ... Lace ribbon 


I have created the background using different pieces of pattern paper ,Doily diecut & lace.
I finished it off using some hand stiching & chipboard diecut (Finally)

SUPPLIES LIST:

INKS
TH distress ink pad .. Vintage Photo

PAPER/CARD
Heavy weight paper (local store)

Pattern paper from my stash

DIES

Ultimate Crafts Snowfall Doily


Punch Bunch, Birch Leaf

ACCESSORIES & TOOLS

Paperflowers
Tulle, 
Lace ribbon
Tacky Glue
Chipboard sticker
Pearl Bling all from my stash

I hope you found some inspiration today. Thanks for stopping by. 

I will be entering this piece into the following challenges:-

diecuttindivas.blogspot-Altenew for April 

simonsaysstampblog-A Trio Of Something 


Sunday, 1 April 2018

Sweet Mixed Media Card

I have a Design Team project to show you today for our April Challenge at Hiraf Blog. This months challenge has a dreamy pastel mood board.


I have created a collage/mixed media style card based around those beautiful pastel colours and sweet things using an image from my stash of some yummy macaroons

I used some DIY texture paste through a Handmade stencil to create some depth and dimension, then added a bit of stamping before adding the colour with my DIY ink sprays {you can find the recipe for the sprays below}.


Finally I used some distressed inks to distress the edges of the card and two word tags to complete the look.


SUPPLIES LIST:
STAMPS
TPC Studio "Cupcakes"
INKS
Stazon jet black
DIY alcohol ink sprays
TH distress ink pads .. mustard seed, tumbled glass & worn lipstick
PAPER/CARD
Heavy weight paper (local store)
DIES
Sizzix/Tim Holtz - Alterations Collection - Mixed Media
ACCESSORIES & TOOLS
Prima Marketing/Finnabair Metallic Mica Powder
Tacky Glue
DIY modeling paste
Bling from my stash

........................................................................................................................

How To Make Your Own Alcohol Inks 


SUPPLIES:-
Rubbing Alcohol
Small Spray Bottles
Inexpensive Markers (similar to Sharpies)

INSTRUCTIONS:- {Ensure you wear gloves this can be a bit messy}

1. Fill up the spray bottle to about half full with the rubbing alcohol.
2. Pull apart the markers one at a time and remove the ink foam tube, drop this immediately into the alcohol and leave to soak out all the ink for a few hours (you can carefully cut the tube in half to fit if needed)
3. Remove the tube and squeeze out all the liquid into the bottle. Replace the spray top and shake gently to mix
I ended up with a nice selection of colours which were really quite vivid. Happy Spritzing :)


اهلا بكم اصدقاء حرف

عدنا لكم بتحدي جديد وآلوان زاهية ، لوح الالهام لهذا الشهر بعنوان " حلم

احلامنا دائما ما تبدا صغيرة ،صادقة ، ومليئة بالحب ، كوردة زاهية ، كابتسامة طفل في عالم من الخيال " حلم هو بداية !


في انتظار مشاركاتكم


مدونة حرف https://hirafartsandcolors.blogspot.com.eg/2018/02/blog-post_28.html


I hope you found some inspiration today. Thanks for stopping by.❤

I will be entering this piece into the following challenges:-
AG- http://www.simonsaysstampblog.com/wednesdaychallenge/
inking technique!- Work It Wednesday March 2018
http://www.simonsaysstampblog.com/blog/work-wednesday-march-2018/Challenge #328 - #329 - Anything Goes
http://wordartwednesday.blogspot.com.eg/
Pile It On Challenge #141 - Think Small
http://pileitonchallenge.blogspot.com.eg/
Ag- https://die-cut-divas.blogspot.com.eg/2018/04/altenew-for-april.html?m=1

Friday, 30 March 2018

In Paris Shadow Box Card

Hello crafters!

I decided to create something different ^_^ as a gift for a friend . 

The Shadow box card was a perfect way to capture the scene of 

french cafe.

I used some very heavy card stock this time and it really did help


I'm sure the recipient will get excited when she notices that the card is dimensional and will display it with delight.

i'm playing along in a few challenge too :-

Thanks for stopping by ^_^  

Tuesday, 27 March 2018

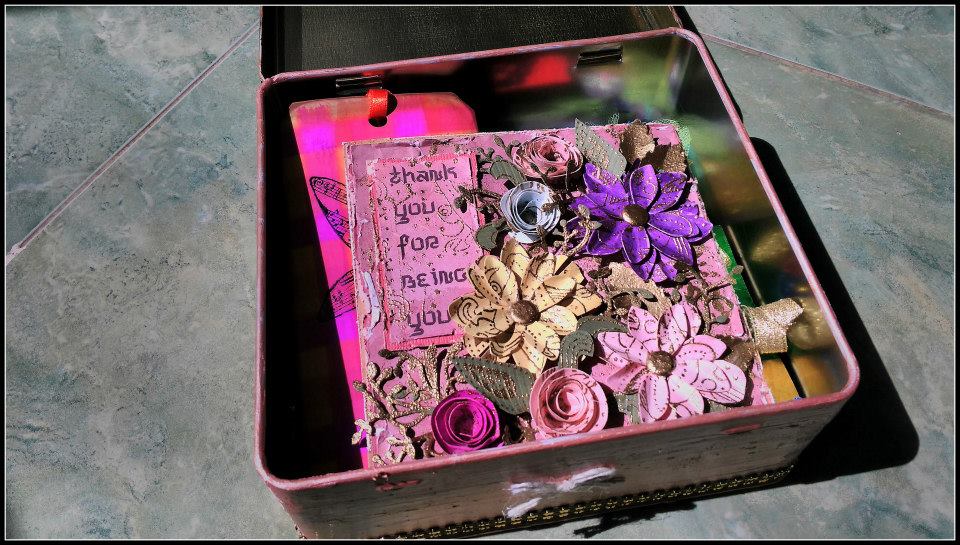
Altered tin box ^_^

Hey everyone!!!
I hope all is well!! I have a fun project to show you all today

i have altered a tea tin box into a cards keepsake


by painting & distressing it to add antique look


Supplies list :

Stamps-
Freebie stamp set
DIES-
spellbinders fairy die
spellbinder corner die
Ink- 
Versa ink , black Memento, Distress inks (TH) (VINTAGE PHOTO)
Paper/Card-
Heavy weight white paper (local store) 
Accessories and Tools- 
Ultra thick clear eb powder; heat tool,pearl acrylic paint,Gesso,golden acrylic paint, Tim Holtz distress tools ,Distress markers, Ranger Glossy Accents , Tacky Glue from my stash, flat back beads stripes

i'm playing along in a few challenge too :-

Thanks for stopping by ^_^  


Monday, 26 March 2018

Mixed media card

Hey everyone!!!I hope all is well J
I have mixed media card to show you all today......CHECK IT OUT!!!
I made this mixed media piece for Simonsaysstamps Monday challenge; idea inspired by the journey through life 
& It is good enough for all sorts black & white challenge ^_^


I have created the background with tissue paper. For the stenciling I made my own card stencil using a Tim Holtz die.

Then I used DIY modeling paste to add a lovely texture to card

(You can find the recipe below if you fancy making some 

yourself)

Finished off with more stamping & some shading to add depth & interest


HOMEMADE TEXTURE PASTE 1/4 cup of white cement (grouting powder) 1 tablespoon White All-purpose School Glue 1 tablespoon White Craft Paint A little Water as needed. Instructions: Combine cement/grout powder, glue, and white paint using a disposable wooden stick or plastic spoon in an airtight container, add a little water until you get it to the consistency you are looking for. Mix well to eliminate any lumps. Cover & use as needed.

Supplies list :

-
Tim Holtz/Stampers Anonymous - JUST THOUGHTS Unbranded texture stamp INKS- Versamark StazOn jet black PAPER/CARD- Heavy weight paper (local store) DIES Sizzix/Tim Holtz - Alterations Collection - Mixed Media Tim Holtz/Sizzix - Umbrella Man ACCESSORIES & TOOLS- Prima Marketing/Finnabair Metallic Mica Powder Craft tissue Tacky Glue, Black acrylic paint DIY modeling paste

I hope you found some inspiration today. Thanks for stopping by. 

I'm playing along in a few challenges too :-
-Week 460 - Black and White only
-Road Trip
http://www.simonsaysstampblog.com/mondaychallenge/
-monochrome color
https://die-cut-divas.blogspot.com.eg/2018/03/check-out-challenge-and-cheapo-dies.html
-Masculine "Anything Goes"  http://watercoolerchallenges.blogspot.com.eg
-craftyfriendschallengeblog http://craftyfriendschallengeblog.blogspot.com.eg/

Saturday, 24 March 2018

Happy Birthday Card ^_^

Hi everyone
I’d like to share this cute shadow box card with you today.


I had lots of fun coloring the stamped image with watercolors then i layered it with cool pattern paper.


I finished it all wit pink ribbon, music notes die cut & crochet flowers ^_^


card design instructions :
"This tutorial was found on Pinterest & designed by DebDuz scrappin"

1. Cut (2) pieces of cardstock 17 cm *13 cm
2. While cardstock is laying horizontally, score
at 1cm and 2cm from each edge of cardstock.
3. On only ONE of the two pieces, cut out a
center opening. Do not cut this opening too close
to the left/right edges, otherwise when you fold
your card flat, you will see the folded pieces in
your cut out opening. So if you are scoring at 1cm
then you want to make sure you have a 1 cm space

between score line and cut out opening.
4. Fold on score lines.
5. Glue the front to the back on the first folded flap
On each side of the card.
6. Embellish card as desired


Supplies list :


STAMPS:


Nicola Storr Clear Stamps: Pumpkin Treats Ladies


PAPER/CARD:


Heavy weight green paper (local store)
pattern paper from my stash


ACCESSORIES & TOOLS:


Prima's Tropical watercolors , paint brush


pink ribbon

Nellie's Multi Frames Dies Ovals Scallops MFD013 


non branded  music notes die


Tim Holtz/Tonic Scissors

handmade crochet flowers


Thanks for stopping by ^_^